
Gears of INDUSTRY
A comprehensive guide!
Guide index:A comprehensive guide!
1: What is Gears of industry?
2: Machine Types
2.1: CWU Terminal
2.2: Battery Charger
2.3: Data-disc
2.4: Fabricators
3: Economy
3.1: Ration distribution
3.2: Coupon redemption
3.3: Bartering menu stocks
3.4: Faction Budgets
3.5: Loans
3.6: Shop terminals
4: Setting up Cities
4.1: City Types
4.2: The main city
4.3: Other world map Cities
What is Gears of Industry? |
Gears of Industry is a brand new plugin, developed by the Willard Network development team. There are many facets and intricate parts of this new update, which will all be run through in this guide. Various aspects of the economy, city stocks, city budget and factions budgets are controlled by the GoI mechanics. Manufacturing of items for stock is a very large part of this update and the focal point of almost all functions held within. World lore cities can be added to or subtracted from the GoI functions, allowing for a more immersive and true to life feel for those RPing in our servers. What used to be done in a fictional sense, can be done in the literal sense between cities across the world map with physical stocks and actual risk of loss or bankruptcy, if players and their characters do not keep a firm hand on proceedings or factions alike.
Machine Types |
There are four new entities for GoI (Gears of industry) that can be placed into the world. All are located in the HL2RP menu of the entities spawner. There are also some additions given to the pickup terminal and the ration dispenser, which will be run through in the following list.
CWU Terminal
As the name suggests, this is a new entity for the civil workers union and any other faction that requires access to its functions. There are several features and assets within this terminal, which may or may not be available to all who have access to it. Those functions can range from:
Stock selling/buying
Faction budgets
Taking loans/Paying off loans
Stock Acquisitions
Workshift Information

City StocksFaction budgets
Taking loans/Paying off loans
Stock Acquisitions
Workshift Information
The terminal has the capability of controlling a lot of the cities functions. The above image demonstrates some of its features, whilst not going into a great deal of detail.
Starting with stocks, the city will have to start controlling them through the efforts of the CWU and their shifts, manufacturing script items and placing them into the pickup terminals to be stored in a virtual warehouse, ready for the general consumer to purchase from the bartering menu in the skills tab, or buying directly from the CWU and retrieved from the city stocks by a worker for delivery to the requesting store.
Some items cannot be retrieved from the terminal, such as weapons or ammunition. Those and others are restricted behind faction whitelists and dependent on them for access. This is not a bug, as some of the higher tier level items in weapons would not be available in a combine system to the general population.
Import/Export
City Twenty-four is not alone in the world lore and along with those come trade possibilities, with the chance to make money on anything the city produces.
Not every city will be the same, each having their own needs and desires, product availability and prices. Whilst City twenty-four is completely player driven on the main server, after some initial balancing and eco setup from the administration team, secondary and tertiary cities will require setup and continual maintenance to ensure that players in the CWU and other factions can sell or make purchases from other virtual territories..
Various inputs will be required when setting up a city. Some of those can include; produced items, city income over a given number of hours, prices, deficit and abundance stock denominations, price fluctuations based on given numerical inputs.

This screen shows all details pertaining to the city funding, total stock items in storage and any loans outstanding. A factions budget can be added too or subtracted from on this page, allowing those who control or have control of the faction budget to make repayments or request funds from.
Those with the correct faction whitelist can also take out loans from another city. These will create debt for city twenty-four and could create funding issues further down the line, if not paid off in full or parts on a weekly basis.
Shift
The shift screen allows the user to setup a workshift, much in the same manner as a normal terminal. Social credits and ration coupons can be given to those participating in the workshift, pausing the workshift can be done on this screen and broadcasts can also be done with the push of a button.
Battery Charger

Data-Disc Scanner


Fabricator

Fabricators
The fabricator is the be all and end all of the cities production. Everything from food and drinks, clothing items in all forms, drugs and medical items, weapons and other combine required assets can be manufactured in a fabricator. Some of its capabilities are restricted behind the combines security and may not allow an end user to make them, depending on their civil status and access card level. This machine is also capable of recycling items back into their core component parts.There are three types of resources for producing items within the fabricator. Biopaste, Resin and advanced resin. Biopaste is a cheap and basic resource, mainly used in the prioduction of food, drinks and medical products, depending on the tier level of the item. Resin is the next step and a slightly more advanced material used to manufacture a variety of mid tier items, such as scissors, spoons, toolkits and cooking pots. Advanced resin is the highest level resource and for that reason, the most expensive to obtain. One of its primary uses is to manufacture weapons, along side vortiguant shackles and hooks.
Fabricating items requires encoded data-discs. As in the example above, we have a data-disc that can produce scissors. After slotting the data-disc into the fabricator, we can turn on the machine with the button to the left hand side of the main display. We are then presented with three options; Fabricate, Recycle, Bioprocess. Selecting the bioprocess button will bring you to a new menu. If done correctly, this will inform the user that the encoded item is Scissors. An image of the item will be displayed, with a resource requirement displayed just beneath this image. With this example scissors require one piece of resin to produce. The resource does not need manually adding to the machine and can remain in your inventory. If none of the required materials exist in your inventory a message will appear in the top right hand corner of your screen, informing you that this resource is missing and cannot be produced.

All items that can be manufactured, can also be recycled back into their core components. Three buttons will appear on the main screen, the center one being the recycling button. After pressing this button, a new menu will appear with two new buttons. An open/close button for the fabricator doors and a recycle button. Recycling items requires that they exist inside the machine, as they do when they appear after the fabrication process. To do this, drop the item from your inventory to the floor and pick it up, then place it into the receptacle. After inserting the item into the machine, the doors can be closed and the process started, by pressing the recycle button on the screen. Doing this will then disintegrate the item and return the base cost of the material used to manufacture it.BioProcess
As mentioned above, food items, drinks, crafting components, clothing, bags and some medical items can only be made with biopaste. this being the case all fabricators are coded to include a predefined list of items that can be manufactured from biopaste.From the main menu a bioprocess button will appear on the right hand side of three total buttons. After pressing this button a new menu will appear, with two buttons that allow the user to move between items. Using breen water as an example and using the next or previous button to find this in the list, one biopaste will be required to manufacture it. This is listed below the items name, to the left hand side of the items image. Below the image is a synthesize button, allowing the machine to manufacture the item if the required resources are in the players inventory. If the resources are not in the players inventory, a message will appear at the top right of the game screen, informing the player that they do not have the required materials.
Economy |
The GoI plugin will control all aspects of the economy on the server, such as the bartering menu stocks, ration distributions and ration coupon redemption's. What this means is that without a continual production of products and materials, management of city funds and careful oversight of faction budgets, the city can either soar into great financial heights or plummet into crippling debt.
Ration Distribution
To procure rations from the RDT, the city will require funds. So long as city twenty-four (Or whichever city is currently being RP'd) remains in financially good standing, the rations will continue to flow as normal for all citizens. If the city falls into debt and the city fund pot runs to zero, rations cannot be distributed by the terminals.
Coupon Redemption's
As above, the same is applied to rations coupons in all their denominations. If the city fund is healthy, anyone with a coupon can redeem them in the usual manner. Should the city funds fall into the red and drop to zero, coupons cannot be redeemed for their electronic counterpart.
Bartering menu stocks
Unlike how this worked before the arrival of GoI, all stocks upon initial start of a server with this plugin enabled will be reverted to zero and controlled by the plugin itself. Items can be predetermined in a city fund editing menu, restricted to higher staff levels to prevent malicious editing.
To gain products for sale through the bartering menu, there are multiple ways to add them into the system. Using Scissors as an example, if they already exist in the world, inside a container, they can be removed from the container and dropped into a pickup terminal. When the item's hitreg meets the pickup terminals own, the item will disapere, along with a sound from the terminal to acknoledge the action has been completed. Upon observing the city stocks with the CWU Terminal, the item will now appear within the stocks, along with a numerical increase of one to the item in the bartering menu.
Another method to increase the stock levels is through the process of trading with other cities. If another city has a required item in stock, those with the correct privilages can buy the product, using the city funds to make this payment. After purchasing, the item will then appear in the city stocks, ready for those with the permits to purchase them, or for anyone with the correct terminal access to directly send the item to a pickup terminal.
Prices for all items at their base value can still be controlled via the admin settings or the CA PDA. Admins can either pre plan these prices, based on the total price of resources required in their manufacture, or players who run the city with their respective characters can do the roleplay to determine what should cost what.
Faction Budgets
Within the CWU terminal, under the menu labeled status, factions and those within who have access to this function can withdraw credits from the city funds, to use for their respective factions. All monnies withdrawn directly affect the city and as such can mean financial stability or bankruptcy. Funds within the faction budgets can also be transfered back into the city funds, should the need arise.
Loans
In much the same way that stocks from other cities can be traded, loans can also be taken out. This function can be found in the status menu of the CWU terminal and only accessed by those with the correct permissions in game. These loans can directly affect the city fund if not carefully watched, depleting it over time if payments are not made to reduce the debt or clear it in totality.
Shop Terminals

Managing stores, who owns them, the cost of rent and how many permits are enabled for a given store can be controlled in an automated way with the use of the shop terminals. These are setup on a store by store basis, requiring one (if a general consensus is to have them for ease of use) for each store in the game.
When a terminal is spawned it will display a blank screen, requiring three steps to bring it to the status as illustrated in the above image. The first is to link the terminal to a shop. In the image above, this terminal is linked to the store "DB - 8". Once linked the terminal will flash and return to the initial blank screen, awaiting the next step phase. Two commands will need to be run, setting up the social credit requirement for those wishing to own the store, and a credit cost for initial purchase. Both when done are displayed as demonstrated above, whilst also showing the weekly rent of the given store once purchased.
After linking the terminal to the store, it should appear as displayed above. Permits can be selected from the list, using the next and previous buttons to cycle through them and toggling the permits required. A minimum of three permits, as dictated by the code at this juncture, must be selected before the store can be purchased, however an upper limit is not controlled by the terminal itself.
After purchasing the store, or after any character is added to a store that has a terminal, via the PDA or other admin commands, the terminal will show that it cannot be purchased and will not allow the player to do so.
Setting up Cities |
City Types

When setting up a new city a type for the city in question is required. This can be found in the city setup menu towards the bottom of the list, labeled "Switch to type editor". Using your initial start as a basis for this guide, no types will appear in the slide bar beneath the return and create type buttons. To start, click the create type button and enter the name of the type you wish to create. Once completed this will appear bellow the two previous buttons. You can now select this type for editing.
Selecting the new type you created will bring up a menu bellow, with various details pertaining to the stocks that any city with this given type will produce over time, along with the passive income credits. As described in the editor, any items listed in the high production category will produce once every hour, adding to the stocks that can be bought from your main server city. Anything from the average column will produce at a lower rate, and even less so from the low production tier. Scrolling down in this menu brings you to the credit income, with two sliders. Passive income being on the left, indicates how many credits will be generated by the city and appear on the CWU terminal under the respective city. Passive income in hours means that the passive income credits, will produce at the given hourly interval selected. For example, type A has a credit income of 20 credits, with a hourly income of 4 hours. Every fours hours, the city will generate 20 credits and continually accumulate over time.
The main city

Cities can be edited from the main menu, the first in this menu being the city your server is portraying. For the English main server as an example, city-24 is listed as being the main city and can be edited to have any number of items in stock from the initial start of your server. In the image above, it shows that city-24 has been selected for editing. Adding items to this list requires the item id from the item menu. Once added, a basic level of stock for each individual item can be predetermined before allowing the players on the server to take control. Scrolling down will then reveal a credit editor, allowing the setup of base level for city funds and kick starting the economy.
Other world map cities

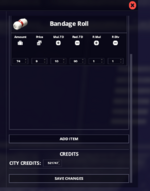
Using the same editor, other cities from the world map or other sectors within given lore can be added or removed. A per-existing type is required when making a new city and already explained above. After clocking the "Create city" button, a prompt will appear asking for a number. A second menu will appear, asking for a type. This predetermined type will then become the baseline for the city being created. As with the main city items can be added to or removed to the stock list for trading. More options will appear with each item, allowing for the base stock level to be adjusted, their prices, thresholds for stock deficits and abundances, a multiplier and divider for when stock goes bellow or above the given thresholds.
As in the image above bandages are being sold by city thirteen. Stock is listed as being 74, with the price being 9. Mul.T D determines the threshold for a lack of stock in this city. The next indicator along determines the abundance threshold. P.Mul when given a value of 2, will multiply the base price by 2 if the city stocks fall bellow the lack threshold whilst the P. Div will double the base price if stocks are in abundance. All of this means that when you are buying from a city on the CWU terminal, depending on the stock levels the prices can increase or decrease from one day to the next.
Last in this creation menu is the city credits. This allows you to set a starting baseline for the city being created. being solely dependent on how you setup the type in the above editor, credits will be added to this baseline over time.
Attachments
Last edited: